
Many years ago I had DIY'd some wall pockets using decorative filing folders that I had on hand. It was a simple project that got us by until I finally handed over some cash for a more permanent solution from Pottery Barn. Don't get me wrong, our Whtie Daily System is probably one of my favorite organizational investments to date, however, it requires wall installation and that is something we don't have right now with the current kitchen renovation. We are wall-less at the moment.
So this past few weeks we have been shuffling papers, losing papers and feeling a little lost. We definitely realized how much those babies get us by on a day-to-day basis. So I decided to get back to my crafty roots and make some new wall pockets with materials I had on hand at home, until we can get our others installed again in the finished kitchen. And because we all love a simple, free and effective organizational solution, I am sharing my little DIY wall pockets as this week's quick tip!
Even if you don't have all of the materials on hand, purchasing them should be fairly inexpensive.

Materials I used:
- Plain manila filing folders (any style or color would do)
- Pencil
- Scissors
- Glue Stick
- Decorative Scrapbook Paper
- Tape
- Command Strips (or some sort of wall hanging product)

The filing folders I had on hand were inexpensive, recycled options that were begging for a face lift. I started by tracing the outline of the folder onto the decorative papers with a pencil.

For projects like these, I like to use a small pair of scissors to give me a little more control with my cutting.

I then cut out my traced edges.

And used a glue stick to affix the solid paper to the inside of the folder first, smearing the glue right along all of the edges.

Before affixing the paper to the outside of the folder, I used small pieces of tape to tape the folder shut. This creates the pocket. You could also use staples, but I prefer to maximize the amount of space available inside.

Glue the second decorative paper to the front and you have yourself a darling little pocket!

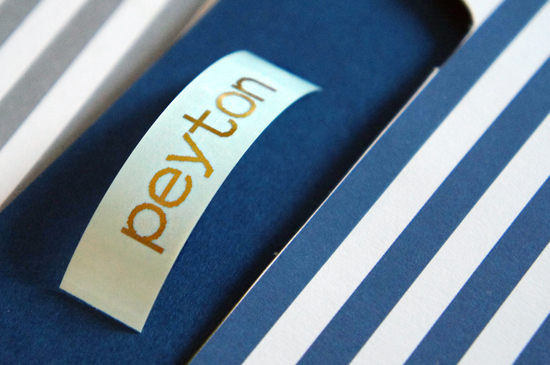
I made one for each boy to use to manage their school papers, so I printed their names with my label maker.

FYI, I recently found that my label maker has the option to use clear tape that prints in GOLD font! If you are a gold lover like me, you will know why this was an amazing discovery!
Once the folders were labeled, I grabbed a few command strips to attach the temporary wall pockets to the wall.

And now we have a temporary organizational system for the boy's paperwork! Wahoo!

And because I didn't staple the edges, the papers fit in the folder in either landscape or portrait orientation.

Raise your hand if you are a lover of wall pockets! And gold labels! And simple yet effective solutions to everyday problems! Happy Tuesday pals!

0 comments:
Post a Comment